Paper mache horn
The latest (current) project is this paper mache experiment. The construction has something in common with these beautiful horns. Paper mache is easy to work with. I also appreciate that it's a silent process - I can listen to the old sound system while working on the new.
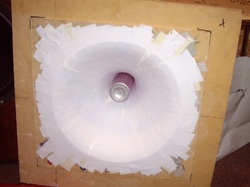
My main variation from John's construction is that I'm using a relatively small mould, then extending the mouth in steps, running the paper mache out onto successively larger rings of MDF. This picture shows the first step of the process, with the moulded section attached to a hearty piece of MDF. Two pieces, really - the paper is stuck to a piece of 3mm MDF which has a perfectly circular cutout. 3mm MDF is trivially easy to cut. That 3mm piece is in turn laminated onto an 18mm thick peice, for rigidity. 18mm is overkill, but I had a piece this size spare, and it keeps the mouth rigid.
The mouth construction kinda borrows from that previous (laminated stacked rings) project, except this one will be a lot lighter, not a solid timber block. Driver will be B&C DE950 again. Being lighter (visually as well as physically) and easier to build than the previous project, I'm tempted to try building a really sizable one.
construction process

1) Second ring added. It is made from a couple of scraps of 3mm MDF, and spaced from the previous ring with a few bits of pine. At this stage, I haven't spent anything at all on materials for this horn - it is entirely made of offcuts, random junk and leftovers. The newspaper was old, glue more so, and the white paint in this pic is from cans a guy on my street was throwing out.

2) Ugly image, but the construction pretty well explains itself. When it is finished, I will put a skin on it, covering these voids. I might use some flooring from a demolition that's happening a short distance away in my suburb.

3) The second ring of MDF has been thoroughly papered over. It is tricky to see in this image, but I am building up a complex shape on the mouth - adding a last, small step, but leaving the corners flat.
The project is approaching completion, and I am thinking about cosmetics and finishing options.
The mouth is 50*50cm.
The project is approaching completion, and I am thinking about cosmetics and finishing options.
The mouth is 50*50cm.
The success and the failure
---Note: this text added last.
The horn was great. Very cool sounding. OK spread of sound, really good on axis. The specs give a plot for the driver on a CD horn - initial expansion, narrow neck, conical expansion - which is flat to 12KHz then low with one big HF spike. No measurements, but it sounded better than the graph looks. Happy HF.
A surprising thing: to test them, I slapped together a low 1st order X-over. I think it was 60uF on the highpass (about 300Hz) and 5.6mF lowpass, and then loads and loads of padding to bring the HF down to match the 12" bass drivers. It sounded really good. I kept it. The driver sounded happy, nothing bad happened.
The failure was the horn mounting - it was weak, and started to sag / come apart. I shelved the horn, to work on one with a better mounting method.
Old text continues below---
Techniques / detail
There is a wealth of detail at http://www.inlowsound.com/ on building similar (and probably better) horns. Rather than repeat all that, I'll just cover differences and what works for me.
I'm using mostly free, found material, and hybrid construction - part mould, part frame. It is not pretty at this stage, but it requires zero dollars, very basic tools, minimal space, and this method let me begin immediately, rather than starting by buying stuff to then make the equipment to make the mould, then making the mould, then...
Picture 3 shows quite a nice, smooth finish, and the last work done was a double layer done quite quickly, using big gobs of the stuff.
A little paint mixed into the glue gives an interesting effect. I'm thinking of doing the final layer with enough white in the mix to mostly bleach / mask the newsprint, allowing just a little to show through.
I might buy some plaster to rapidly bulk up the back of the horn, especially for the driver mount.
Without this lucky find, an easy way I've made a mould from scratch (again, zero tools) is:
- make several cones (different angles) from stiff, heavy paper.
- stack them up: widest cone on the bottom, pointy on top
- tape & glue them together
- add paper mache or plaster to smooth transitions & strengthen it
- paint with oil-based paint or sealer to waterproof
You could use a section of pipe - 2" for a 2" horn, naturally - to skewer / stabilise these cones onto.
Making perfect 2" holes is tricky. I've done it with minimal tools by cutting a rough hole of just under 2", then carefully opening it up to 2". I made a wand for this by attaching sandpaper to the outside of a 1.5" PVC pipe (one end coarse, one end fine), then used it to carefully sand the rough hole out to a smooth and perfect one.
A drill press does this much more easily... so when a friend got one, I asked him to drill some 2" holes in a small MDF sheet so I could use them for future projects such as this. The wand will still be handy for working on the throat, making the initial expansion.
Also, if there is any ripple from the transition from horn (partial space) to free space, a square mouth would spread / diminish it slightly, compared to a round one. A less regular shape would be better, but I don't think I'd like the appearance as much.
- Overall
I'm using mostly free, found material, and hybrid construction - part mould, part frame. It is not pretty at this stage, but it requires zero dollars, very basic tools, minimal space, and this method let me begin immediately, rather than starting by buying stuff to then make the equipment to make the mould, then making the mould, then...
- Glue
Picture 3 shows quite a nice, smooth finish, and the last work done was a double layer done quite quickly, using big gobs of the stuff.
A little paint mixed into the glue gives an interesting effect. I'm thinking of doing the final layer with enough white in the mix to mostly bleach / mask the newsprint, allowing just a little to show through.
- Paper
I might buy some plaster to rapidly bulk up the back of the horn, especially for the driver mount.
- The mould
Without this lucky find, an easy way I've made a mould from scratch (again, zero tools) is:
- make several cones (different angles) from stiff, heavy paper.
- stack them up: widest cone on the bottom, pointy on top
- tape & glue them together
- add paper mache or plaster to smooth transitions & strengthen it
- paint with oil-based paint or sealer to waterproof
You could use a section of pipe - 2" for a 2" horn, naturally - to skewer / stabilise these cones onto.
- Mounting the horn.
Making perfect 2" holes is tricky. I've done it with minimal tools by cutting a rough hole of just under 2", then carefully opening it up to 2". I made a wand for this by attaching sandpaper to the outside of a 1.5" PVC pipe (one end coarse, one end fine), then used it to carefully sand the rough hole out to a smooth and perfect one.
A drill press does this much more easily... so when a friend got one, I asked him to drill some 2" holes in a small MDF sheet so I could use them for future projects such as this. The wand will still be handy for working on the throat, making the initial expansion.
- The square mouth
Also, if there is any ripple from the transition from horn (partial space) to free space, a square mouth would spread / diminish it slightly, compared to a round one. A less regular shape would be better, but I don't think I'd like the appearance as much.
